
GroupSpot was designed to replace the barrage of standalone apps that do one thing and one thing only. This includes events and RSVP, forms, directions, photos, albums, and attachments. One of our favorite examples from this list of features is signups.
While there are competitors whose sole focus is signups, we look at this as an opportunity to add another great feature to the GroupSpot toolbelt. From the beginning, our goal has been to make it super easy to create world-class signups on GroupSpot.
To illustrate, let’s walk through the steps of putting together a five star signup and cover off on any tips and tricks that you may want to consider.
The first thing to know is that signups are attached to posts on GroupSpot. They can be attached to a standard post, an event post, or a game post. Once you’ve added a title and a description to your post, locate the + button in the bottom right corner of your lower navigation. Once selected, a drawer will appear from your lower navigation with different options to add to your post. This is where you choose Signups to get started.
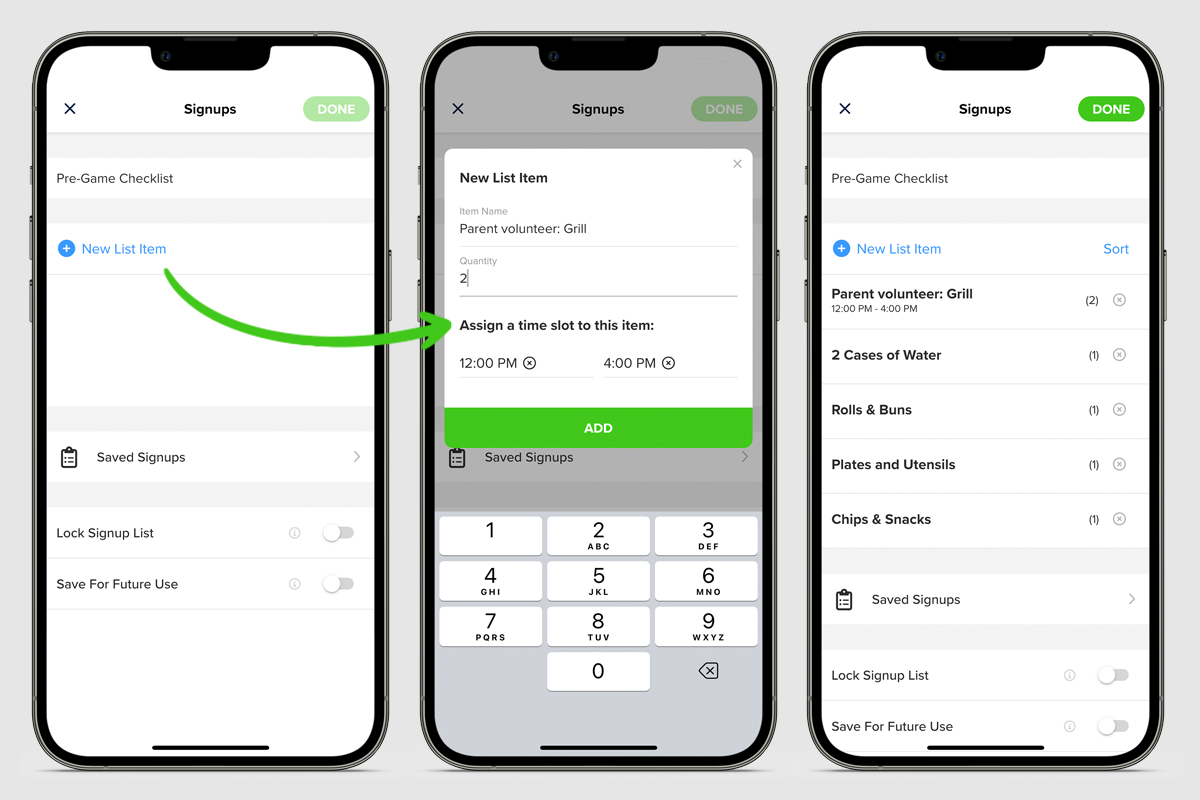
The first thing you will see on the new screen is a prompt to name your signup. Once you’ve done that, it’s time to start adding various items you need in your signup by selecting the blue text that reads New List Item. Once selected, you will be prompted to add your first list item. You will also have the chance to indicate the appropriate quantity, and if necessary, times associated with this particular item. For example, if I need two parent volunteers to man the grill from 12PM to 4PM, I would indicate parent volunteer for my item, two for the quantity, and lastly add the appropriate 12-4PM window of time for when I need my volunteers. I would then select the green ADD button to save this list item.
At this point, I’ve returned to the primary signup screen where I have a few choices. I can continue to add new items to my signup by easily selecting New List Item again and then following the same routine outlined above. Or if my signup is complete and ready to go, I would select the green DONE button located at the top right of the screen.
But before I leave this screen, one thing I may want to consider is turning on the Save for Future Use toggle at the bottom of the screen. In the event I want to repurpose this same sign up or create a signup largely similar to this one with minor editing, we recommend you save this sign up for future use so you do not have to re-re-create the signup from scratch. It’s all about saving time and headache, while getting the best results possible.
At this point once DONE has been selected, you will return to your create post screen and you will notice that your new signup has been attached to your draft post. If you have nothing else to add to this post, go ahead and select the green POST button to share this new post with your community.
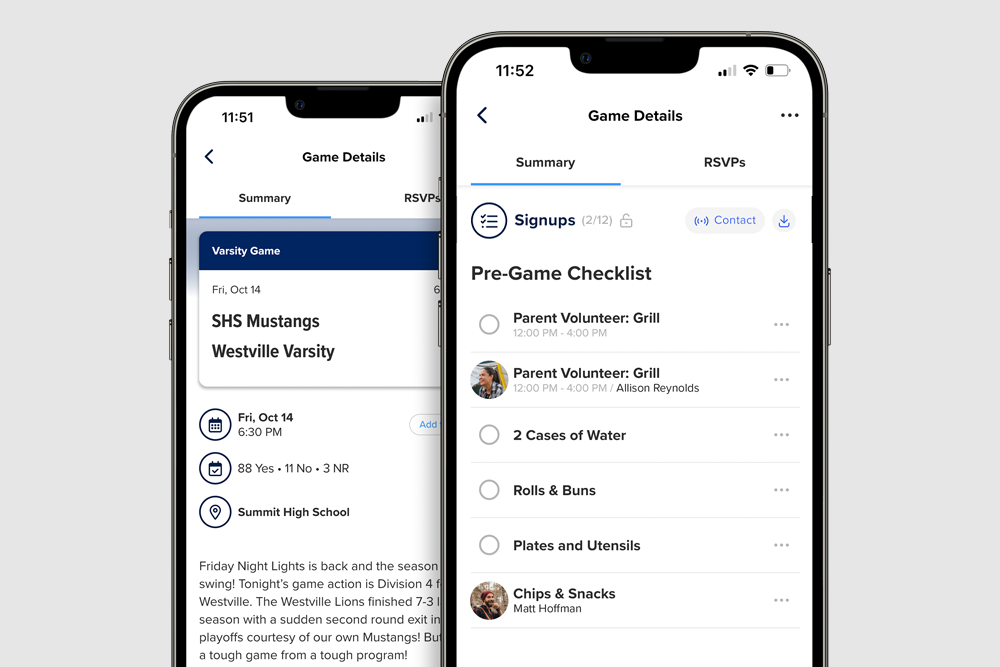
When your members see this new post in their feed, they will see that this post has a signup attached to it with a short, one line summary identifying how many of the total slots needed are actually filled. Once the member clicks into the post, they will see the list of signups. GroupSpot truncates long list signups by showing the first 10 items so that you can still get to the rest of the post or comments quickly. To see the full list of signups, tap on the blue View All Signups button.
When they are ready to sign up, all they need to do is select the open circle button on the left of the list item that they choose. If the member wants to undo their participation, or change to a different list item, all they need to do is hit the ••• menu to the right of the list item to undo their signup. Organizers can also easily assign or unassign a member to a signup from the same ••• menu.
In the ••• menu, you will also find the ability to Leave a Note. This is important in case you need to clarify something. For example, if the list item is dessert, you may want to clarify you’re bringing cupcakes. Additionally, the admin can also write you back to remind you that the cupcakes should be gluten-free. An entire back-and-forth chat can happen inside a row item.
Signups were designed to be simple to put together and participate while also looking great in your feed.
Other helpful resources for admins include the ability to lock a signup and download a CSV file of your signup results. In the event an admin is set with their sign-up, and doesn’t want any further changes, they have the ability to lock the signup. If they edit their post, all they need to do is click on the sign-up row to get into the details of that signup, and turn on the Lock Signup List toggle before saving the new changes. This doesn’t happen often but it is a nice feature if you need it. At any time, locked or unlocked, admins can download a CSV file of their signup results. They just need to tap the download icon at the top of the screen and select Download Results (CSV). This is especially helpful when you don’t have mobile service.
When your signup has been posted, watch how easy it is for your membership to participate once they get the new post notification. In the event where some time has passed and you need to elevate your signup because it’s not full yet, you have a few different options… First, you can always bump your post to the top of your feed at any given time. Just find your post, select the three dot menu on the post, and then choose Bump to Top from the drawer menu. Second, you can send a push notification to your group, especially if time is running out, and you need help filling the sign up ASAP. Third, you can create an in-app alert, which works as a soft reminder for your group which leaves a red badge notification. And then finally, as a last resort, you always have the ability to email your membership and let them know you could use a few extra hands with your signup... And when you don’t need to notify everyone but need to contact only the people who have signed up, you can do so at the top of your signup by hitting the Contact button. Once selected, reach out to only those who’ve signed up with the same options of push notification, in-app alert, email, and chat.
We understand that running a large organization requires many hands. Signups are meant to share the work among the many so that everyone in the group can participate and support the group without the barrage of runaway emails and group texts. From tailgates to concession stands to parent volunteers and beyond, we understand signups are a linchpin in the operations of any organized group. And we’ve designed GroupSpot to be your one-stop-solution for all things signups.
