Track and reward member participation in one simple place
Points make it easy to recognize and track members’ participation. Whether it’s attending an event, completing a task, or volunteering for a project, you can assign points to the activities that matter most to your group.
The Points feature on GroupSpot gives members a quick view of their progress while providing admins with an easy way to recognize and reward participation. In some group types such as college Greek organizations and Scout troops, Points are turned on by default. Other groups that want to use this feature can simply enable it in their Group Settings under Features.

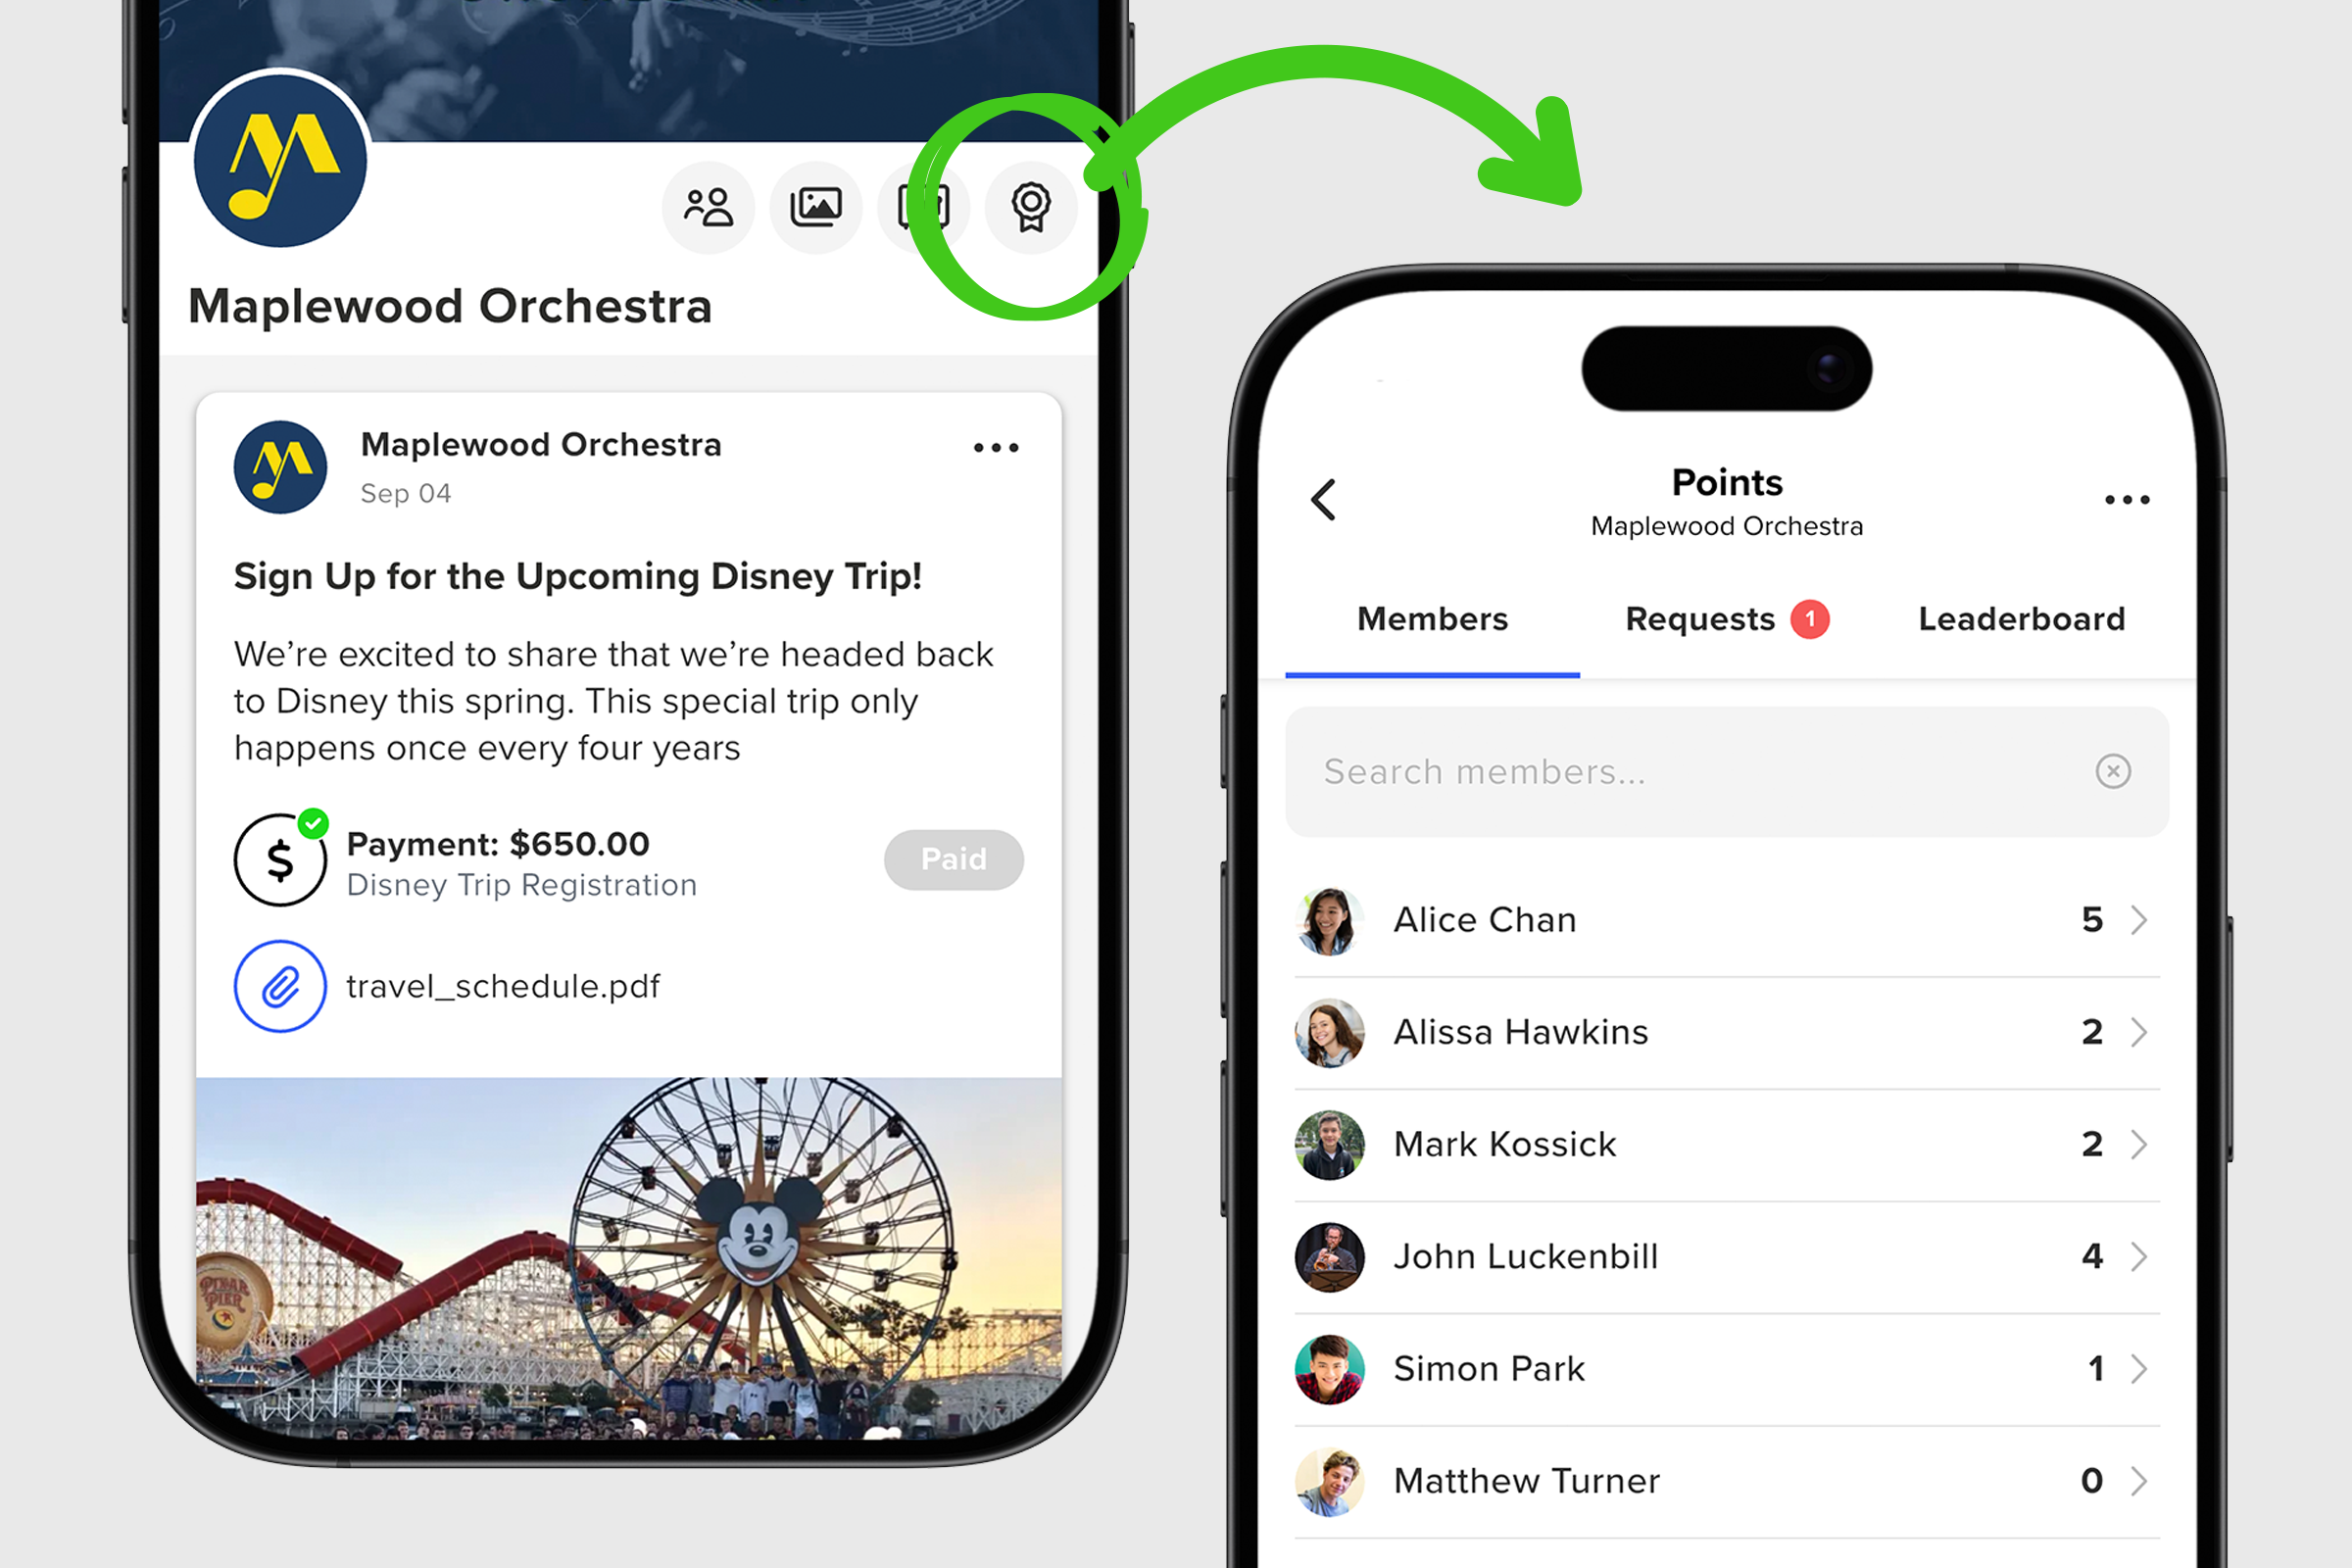
Once Points is turned on, a ribbon icon appears on your home screen. This icon is your shortcut to the Points feature. In Group Settings, you will also find Points Settings under Feature Settings. Inside Points Settings, admins can set point values for common activities such as attendance and sign-ups.
You will also see Calendar Terms. This area lets admins group points into a specific time period such as first semester, second semester or the current school year. Other groups may prefer to use terms like fall, winter and spring. You decide how to define the period of time for your current point allocation. When one term ends and you are ready to start fresh, simply create the next term.
Finally, not every group wants the Leaderboard visible to members. For example, some music groups prefer to use Points as an internal audit of participation without adding competition. In that case, toggle on Hide from members under Leaderboard to keep it out of view.

Once your Points Settings are set up, you are ready to begin using the feature. You can open it by tapping the Points ribbon icon on your group’s home screen or by selecting Points from your group menu.
When the feature opens, the first screen displays your list of Members. Use the search bar to locate members, view their points, and tap the three dot menu (•••) in the upper navigation to Request Points and Award Points.
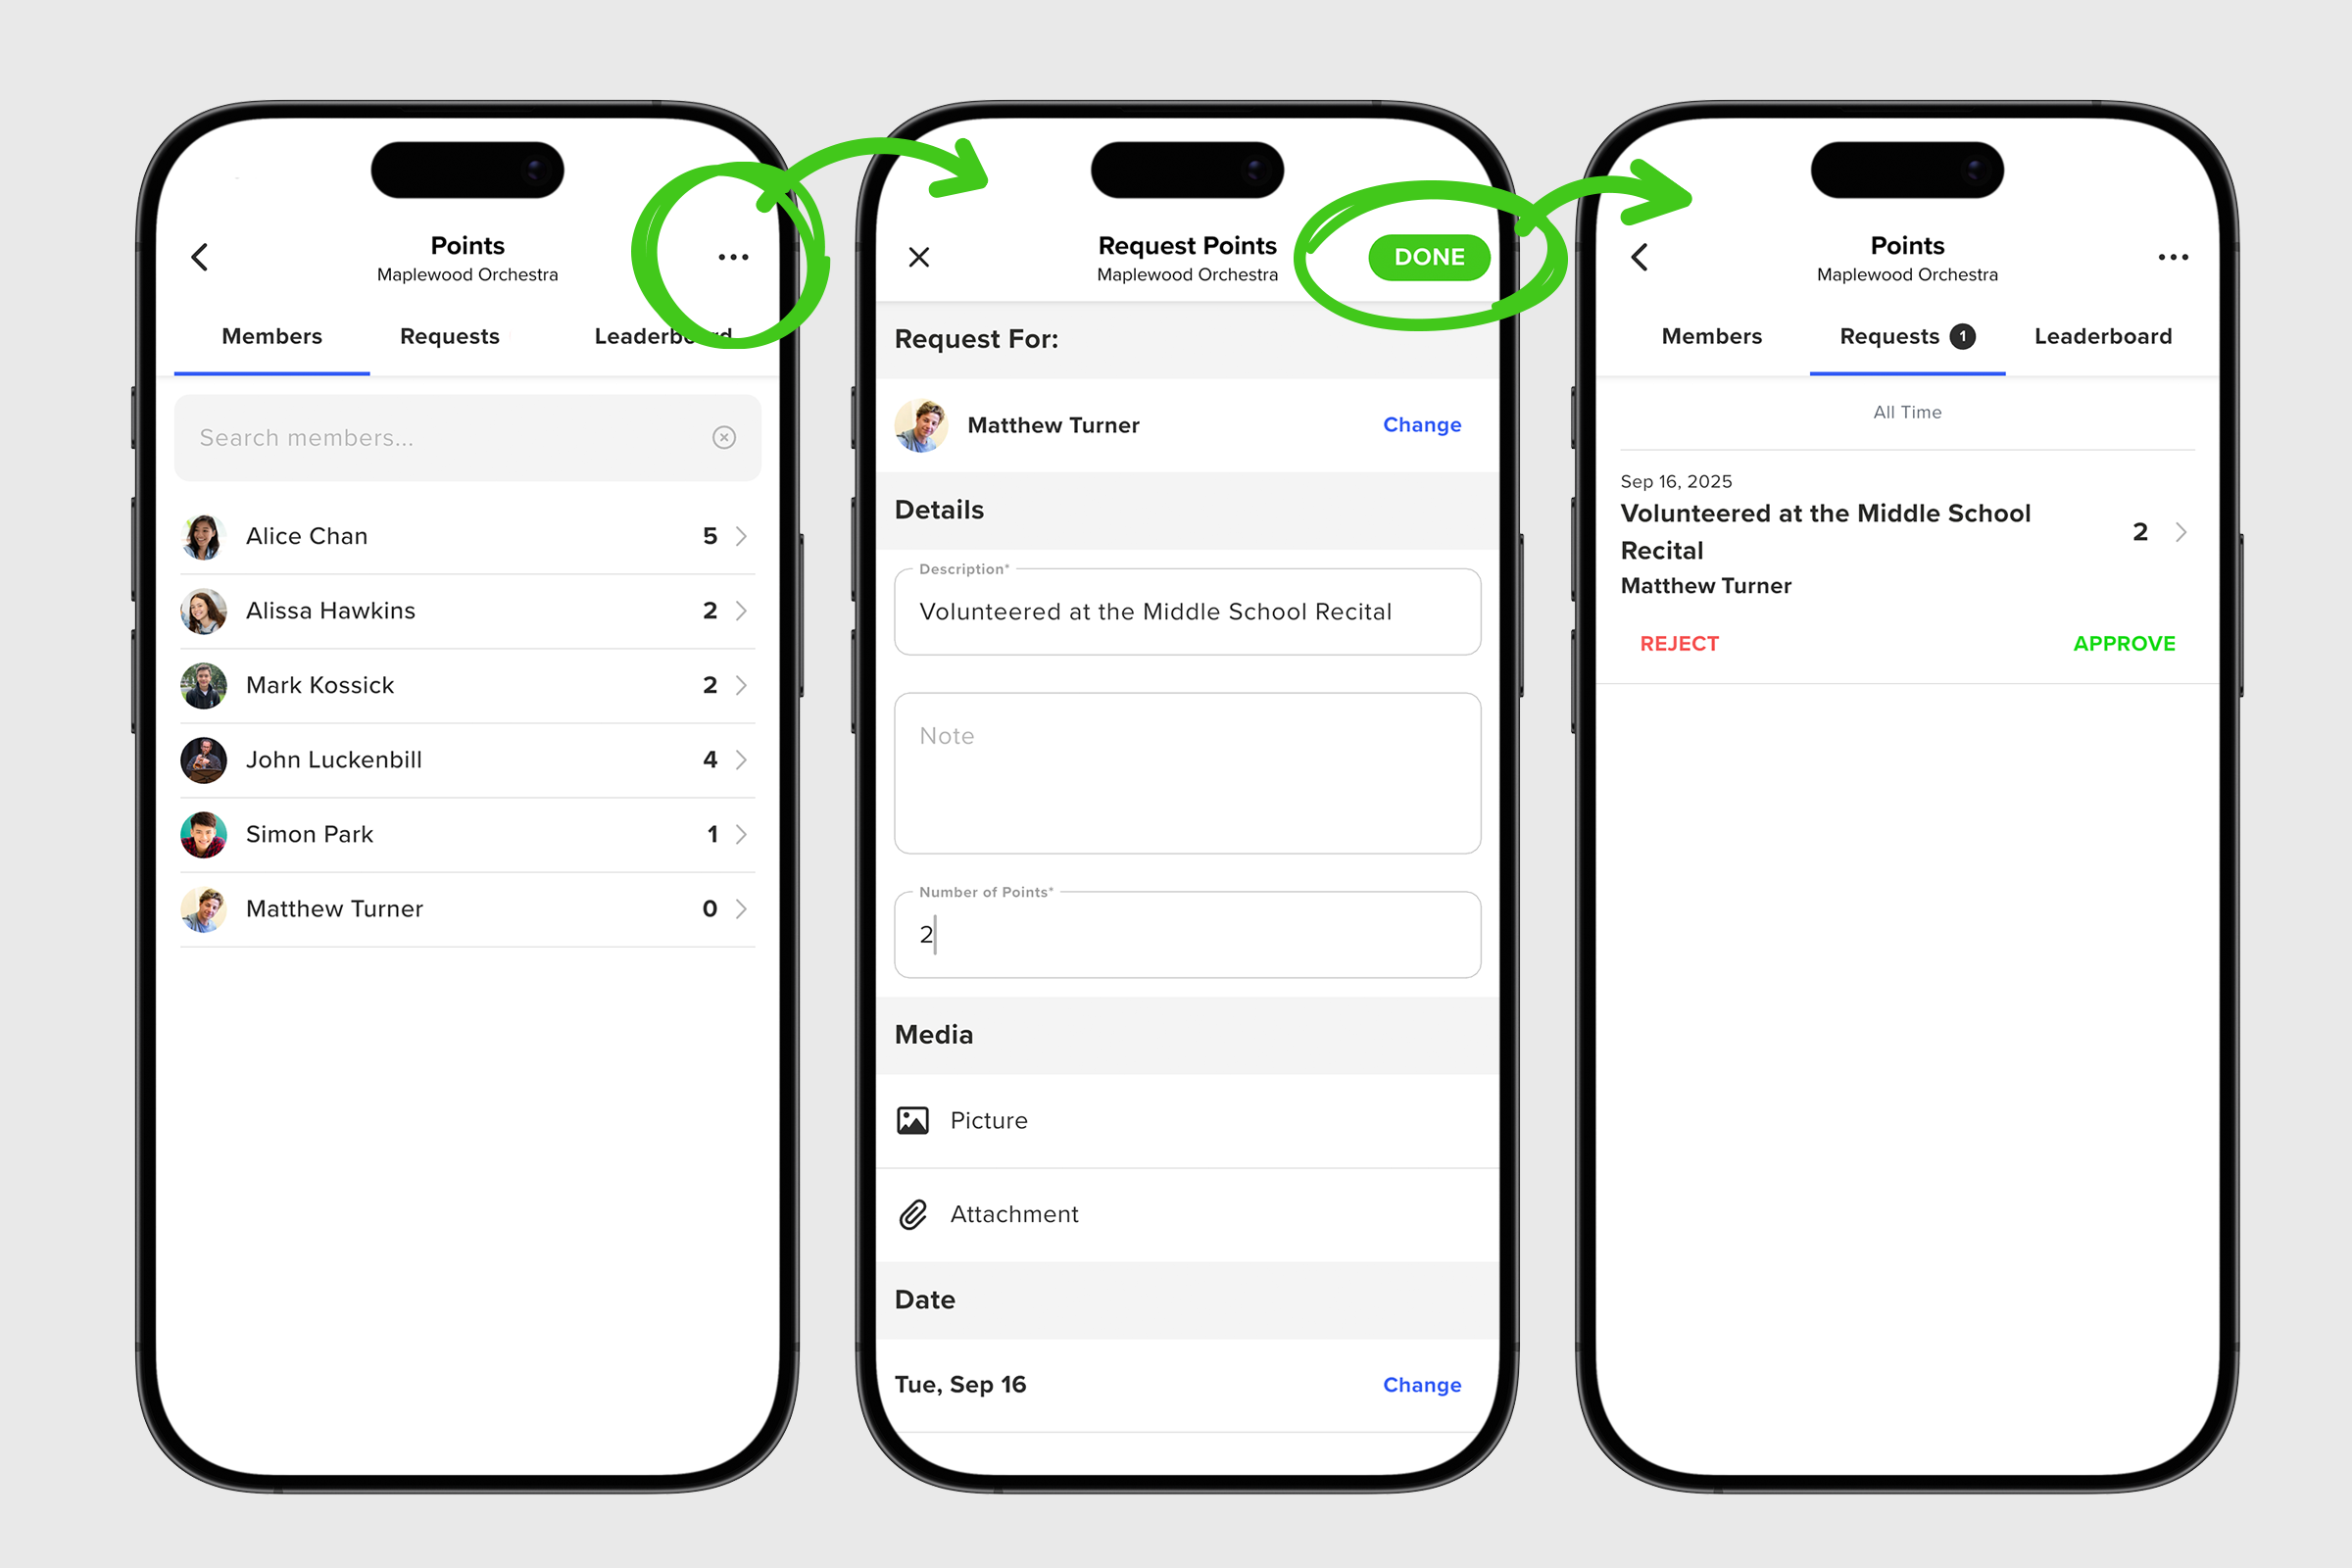
Requesting points is simple. You can request them for yourself or on behalf of another member. Add a Description, include an optional Note, and enter the Number of Points. You can also attach a photo or other file as supporting evidence to strengthen your request.
Awarding Points works in the same way. Choose the member you want to award points to, add the required Description and Number of Points, and optionally include a Note or an attachment to support the award.
Admins can manage incoming point requests from the upper navigation. Tap Requests to see all submissions. Open an individual request to view details and then Approve or Reject it.
If the Leaderboard is active by default or has been turned on manually in Points Settings, it appears as a third tab in the upper navigation. Tap the Leaderboard to see members ranked from highest to lowest points. The three dot menu is available here as well to request or award points whenever needed.
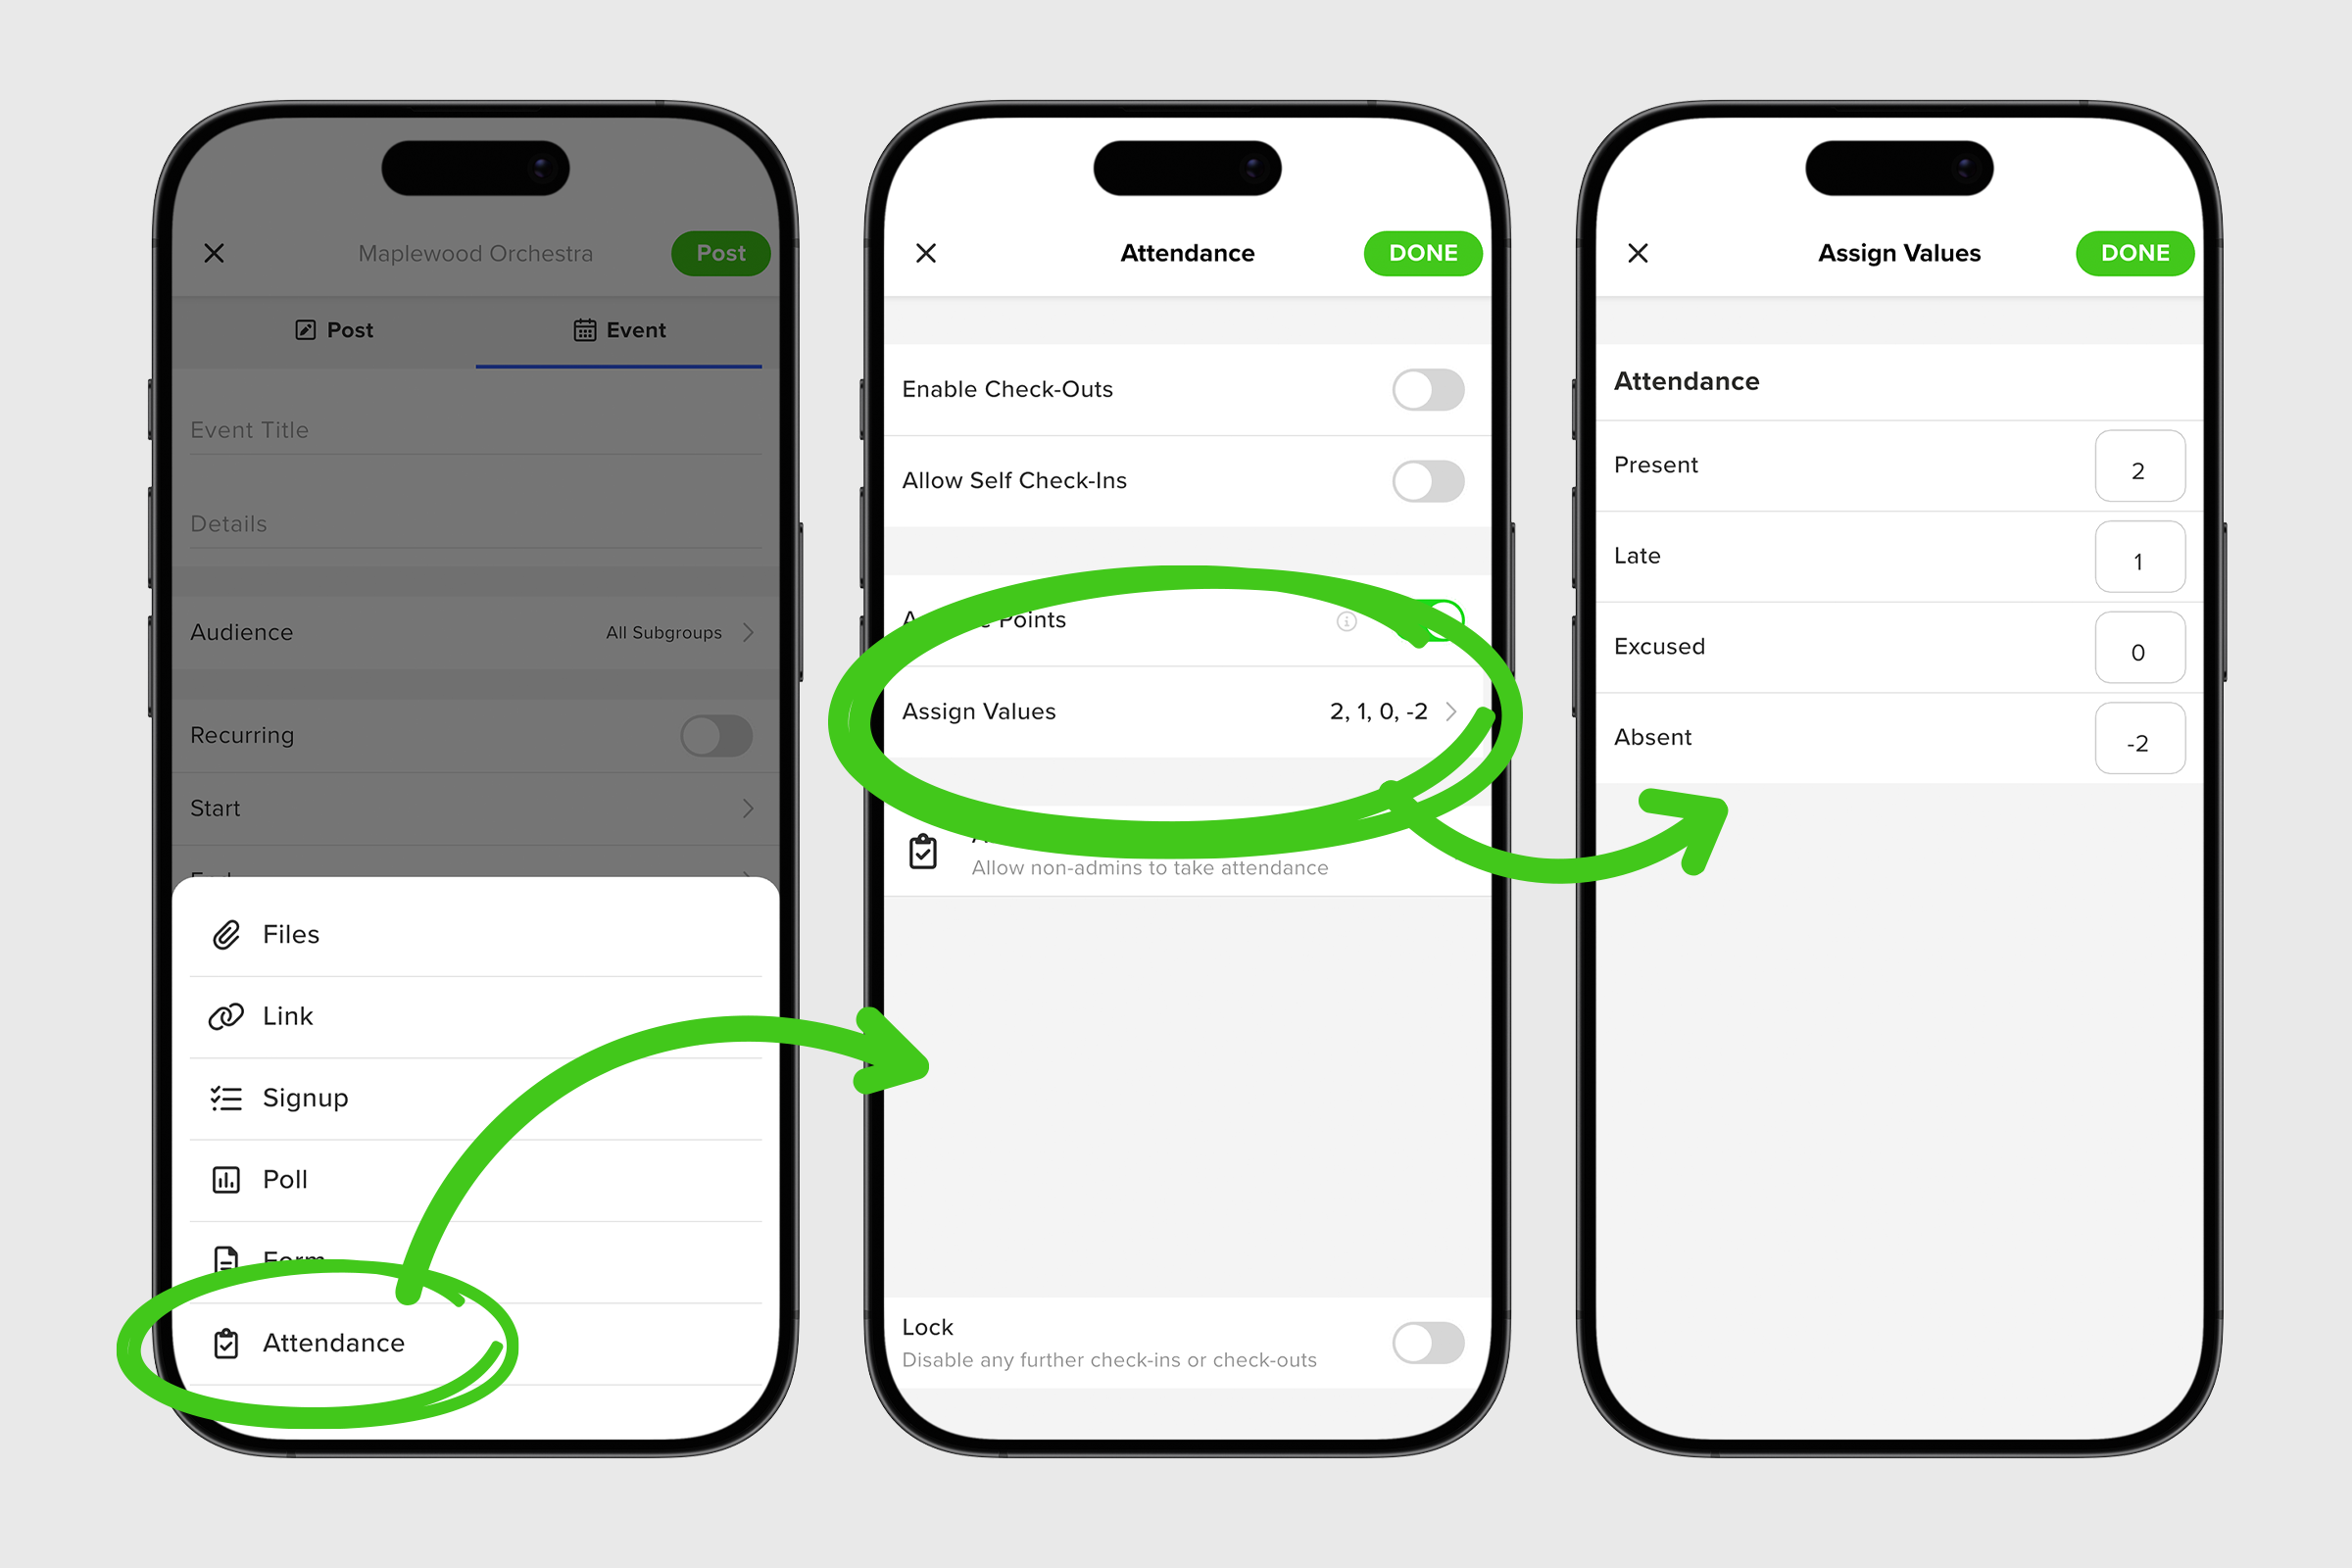
Once the Points feature is enabled and you have set point totals for Attendance and Signups, you can easily add them to any post that includes Attendance or Signup.
When creating a new Signup or adding Attendance, find the Activate Points option and toggle it on. After you do this, the Assign Value line appears below. Your default point value will show there, and if you need to change it for a special circumstance, simply tap that row to update the value. Tap DONE to return to the main screen.
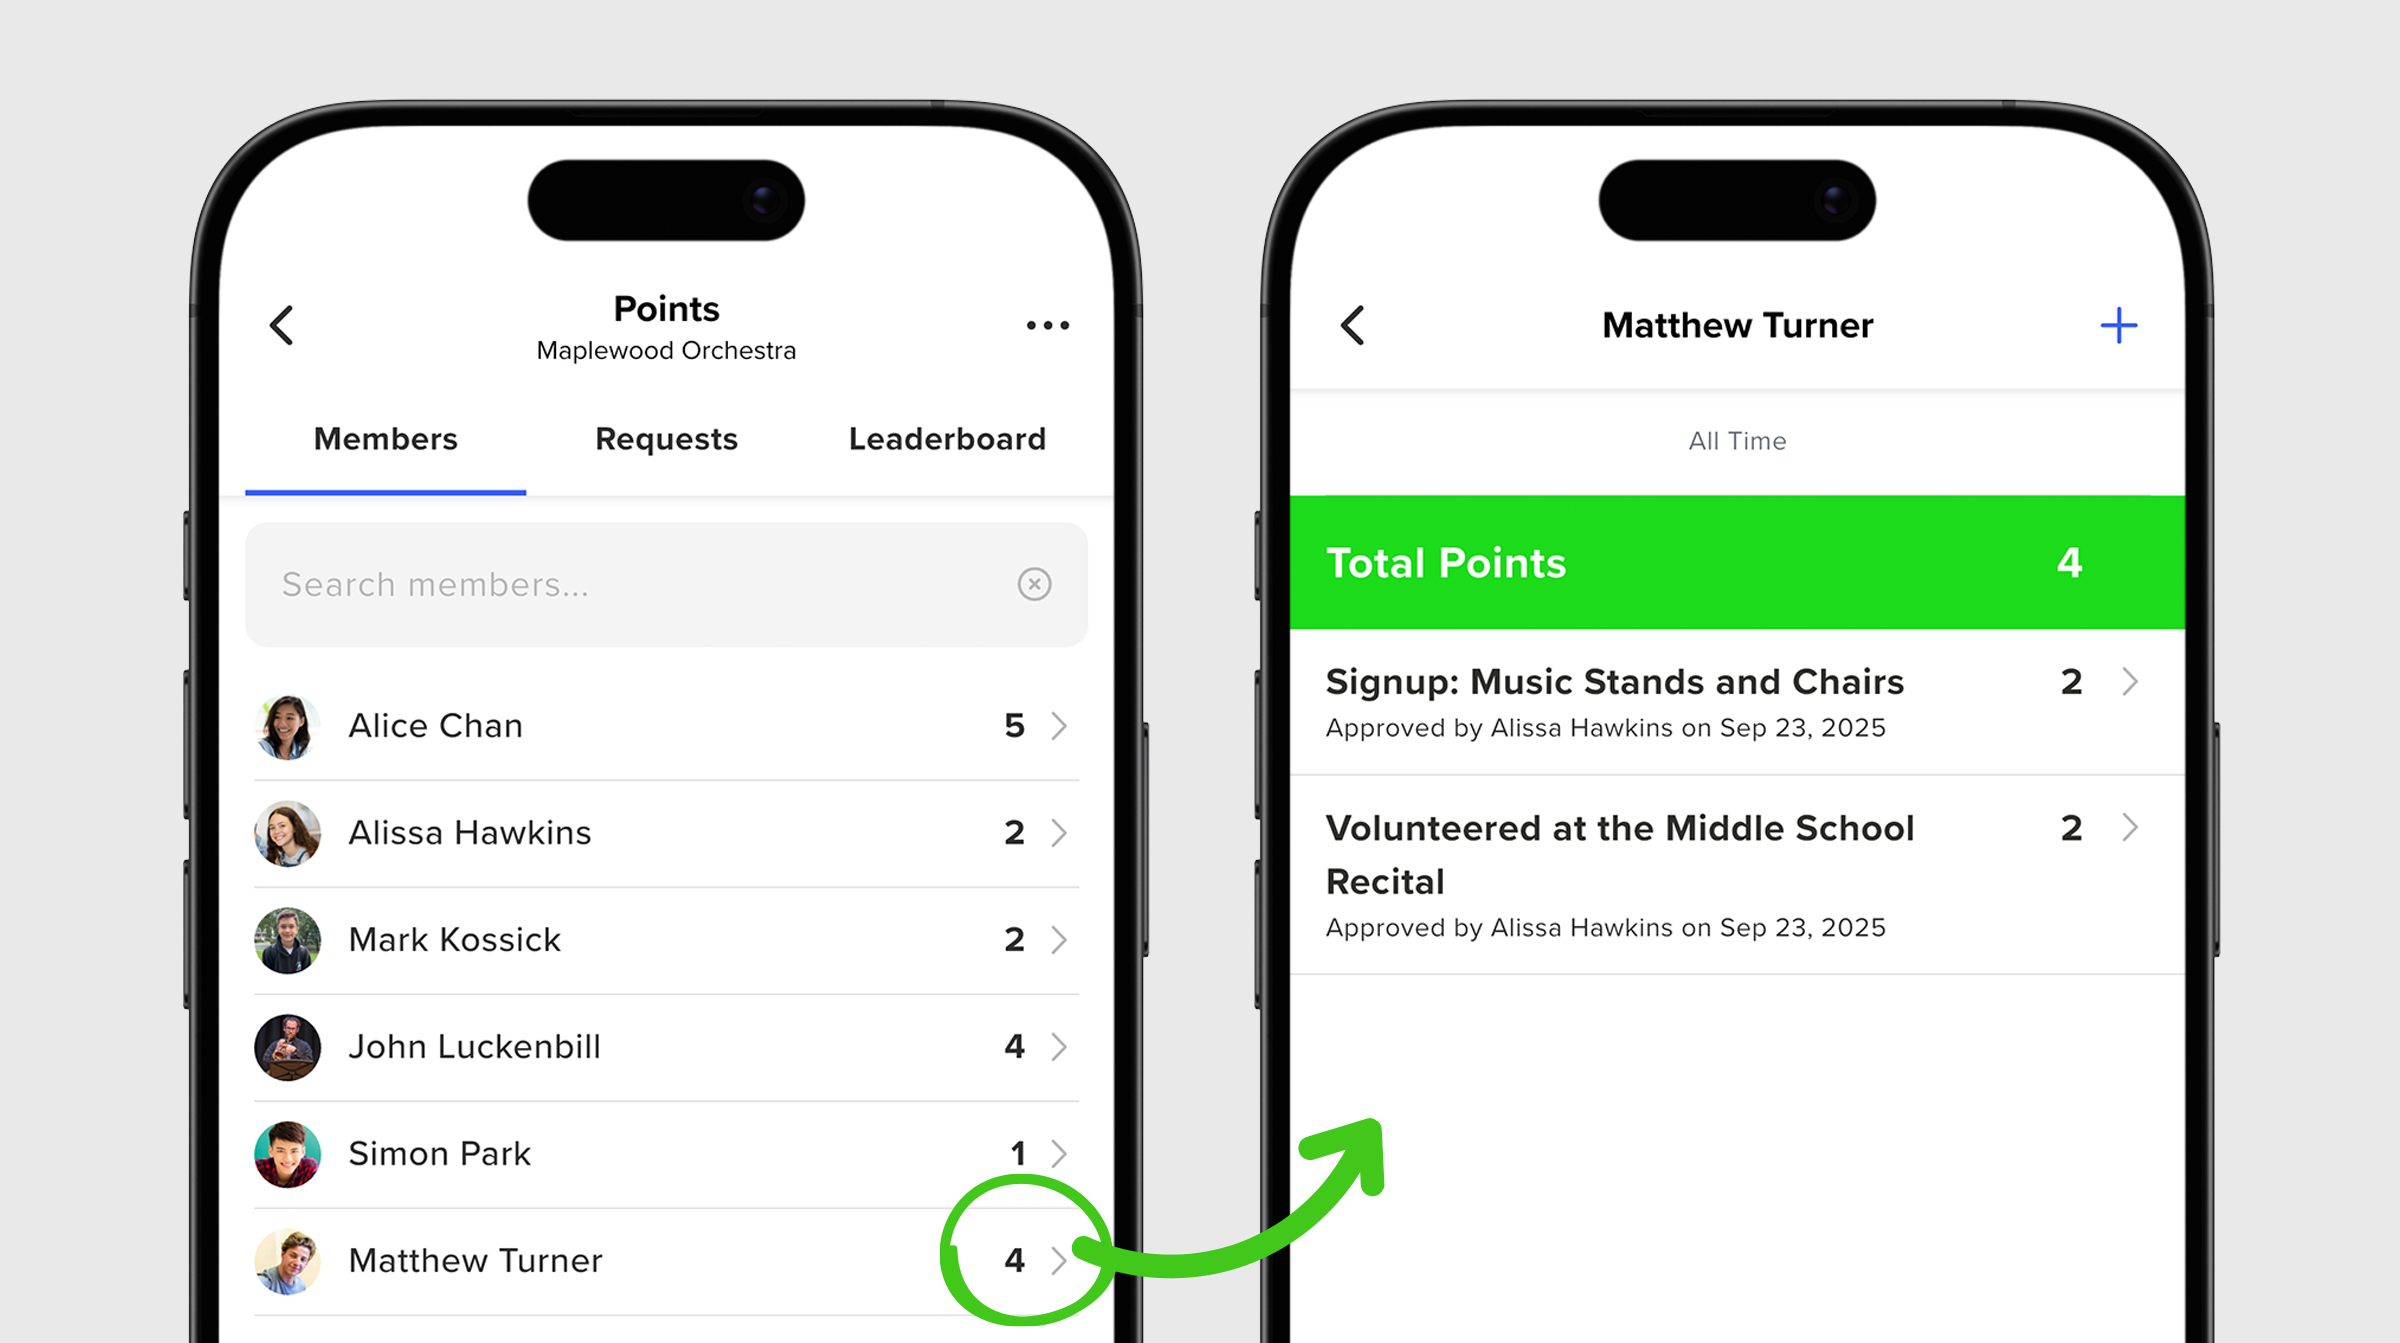
After your new Signup or Attendance post is published, points begin to accumulate as soon as members take action. Signup points are automatically added as signups are confirmed. Attendance points are added once attendance is taken. In both cases, points count toward member totals and appear on the Leaderboard if it is active.
Points for members are simple. They can be earned or awarded for a variety of activities such as attending an event, completing a task, or volunteering for a project, depending on what the group admins set up.
When the Points feature is active, a ribbon icon appears on your home screen. This icon is your shortcut to Points, and you can also access the feature from your group menu.
When you open Points, you arrive at My Points, a ledger that summarizes your personal points history and activity. Tap any activity in the list to see more details about that specific entry.
In the upper navigation you will see a second tab called My Requests. This is where all of your pending requests appear. If you have no requests yet but need to create one, the process is simple.
To request points, tap on the three dot menu (•••)in the upper navigation and select Request Points. You can submit a request for yourself or on behalf of another member. Complete the form by entering the required Description and Number of Points. You can also add an optional Note, Photo, or File. Tap DONE to submit your request.
Finally, if your group has chosen to make the Leaderboard visible, a third tab labeled Leaderboard appears in the upper navigation. Tap it to see the members with the highest point totals listed from top to bottom.
To sum up, points give your group a clear, flexible way to recognize participation and keep everyone informed. With the feature set up and in use, you can streamline sign-ups, attendance, and other requests while making it easy for members to see their progress at a glance.
